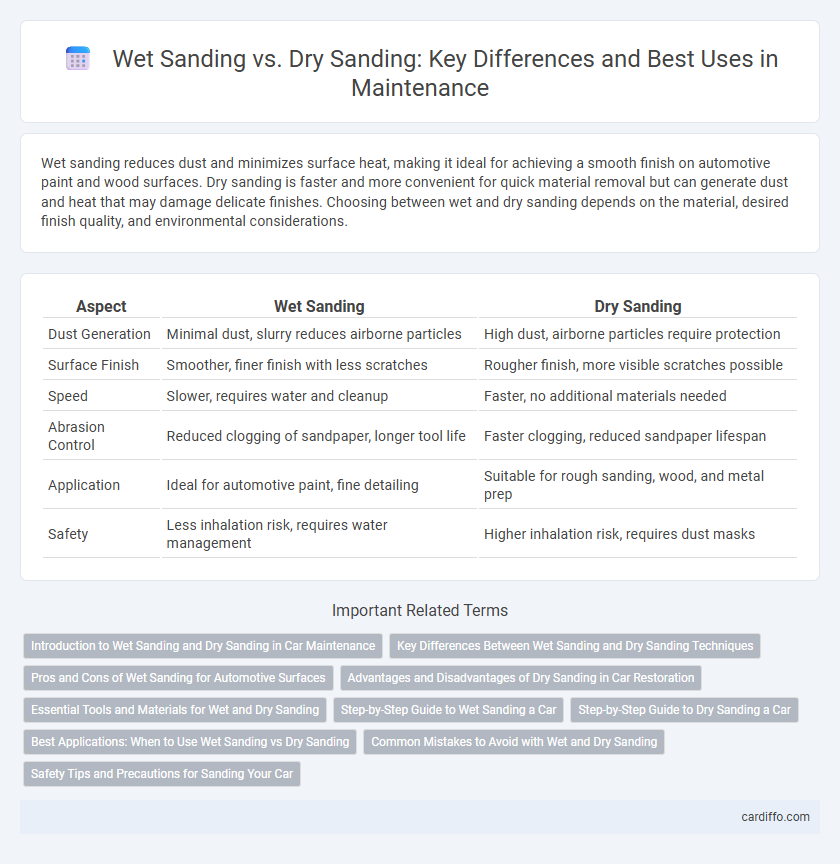
Wet sanding reduces dust and minimizes surface heat, making it ideal for achieving a smooth finish on automotive paint and wood surfaces. Dry sanding is faster and more convenient for quick material removal but can generate dust and heat that may damage delicate finishes. Choosing between wet and dry sanding depends on the material, desired finish quality, and environmental considerations.
Table of Comparison
| Aspect | Wet Sanding | Dry Sanding |
|---|---|---|
| Dust Generation | Minimal dust, slurry reduces airborne particles | High dust, airborne particles require protection |
| Surface Finish | Smoother, finer finish with less scratches | Rougher finish, more visible scratches possible |
| Speed | Slower, requires water and cleanup | Faster, no additional materials needed |
| Abrasion Control | Reduced clogging of sandpaper, longer tool life | Faster clogging, reduced sandpaper lifespan |
| Application | Ideal for automotive paint, fine detailing | Suitable for rough sanding, wood, and metal prep |
| Safety | Less inhalation risk, requires water management | Higher inhalation risk, requires dust masks |
Introduction to Wet Sanding and Dry Sanding in Car Maintenance
Wet sanding involves using water as a lubricant to reduce heat and prevent clogging of the sandpaper while smoothing car surfaces, making it ideal for fine finishing and paint correction. Dry sanding, performed without water, is faster and effective for removing heavy imperfections, but it generates more heat and dust, requiring careful technique to avoid damage. Both methods are essential in car maintenance for achieving a smooth, flawless finish, with wet sanding preferred for delicate tasks and dry sanding for more aggressive material removal.
Key Differences Between Wet Sanding and Dry Sanding Techniques
Wet sanding uses water as a lubricant to reduce heat and clogging, resulting in a smoother finish and minimized dust compared to dry sanding. Dry sanding relies solely on abrasive grit and produces more dust, which can cause surface scratches if not properly managed. Wet sanding is ideal for fine finishing and paint correction, while dry sanding is faster and suitable for heavier material removal.
Pros and Cons of Wet Sanding for Automotive Surfaces
Wet sanding for automotive surfaces offers the advantage of reduced dust and clogging, creating a smoother finish by minimizing surface scratches and heat buildup. It helps in achieving a more refined paint job and is ideal for leveling clear coats or removing minor imperfections without damaging the underlying layers. However, wet sanding requires careful water management to prevent water intrusion, and improper technique can lead to uneven surfaces or sanding through the paint.
Advantages and Disadvantages of Dry Sanding in Car Restoration
Dry sanding in car restoration offers advantages such as quicker material removal and better control over the sanding process, making it ideal for shaping and smoothing surfaces. However, it generates a significant amount of dust, posing health risks and requiring proper ventilation and protective gear. Unlike wet sanding, dry sanding can cause overheating and surface scratches if not done carefully, potentially damaging delicate automotive paint and primers.
Essential Tools and Materials for Wet and Dry Sanding
Essential tools for wet sanding include waterproof sandpaper, a sanding block, and a basin of clean water to minimize dust and prevent clogging. Dry sanding requires abrasive sheets or sanding sponges and dust masks to protect from airborne particles during the process. Both methods benefit from fine-grit sandpaper for smooth finishes, but wet sanding emphasizes water to lubricate and cool surfaces, reducing scratches.
Step-by-Step Guide to Wet Sanding a Car
Wet sanding a car involves using fine-grit sandpaper soaked in water to gently remove surface imperfections, ensuring a smooth and even finish without clogging the abrasive. Begin by thoroughly cleaning the car's surface to eliminate dirt and debris, then soak 1500-3000 grit sandpaper in water for at least 15 minutes before lightly sanding in consistent, circular motions. After sanding, frequently rinse the surface to prevent scratches, follow with polishing to restore shine, and finish with a protective wax coating for long-lasting results.
Step-by-Step Guide to Dry Sanding a Car
Dry sanding a car involves starting with a fine-grit sandpaper, typically 400 to 600 grit, to gently remove imperfections without water interference. Use a sanding block to maintain even pressure and avoid creating low spots; move the block in smooth, overlapping strokes across the surface. Finish by wiping the area clean with a tack cloth to remove dust before applying primer or paint, ensuring a smooth, defect-free finish.
Best Applications: When to Use Wet Sanding vs Dry Sanding
Wet sanding is best used for fine finishing on automotive paint, metal, and wood surfaces where minimal dust and a smooth, swirl-free finish are desired. Dry sanding is suitable for quick material removal on interior drywall, plastics, and rough surfaces where water cannot be applied. Choosing between wet and dry sanding depends on the surface sensitivity, dust control needs, and the required finish quality.
Common Mistakes to Avoid with Wet and Dry Sanding
Common mistakes to avoid with wet sanding include using insufficient water, which can cause clogging and uneven surface finishes, and applying excessive pressure that damages the material. In dry sanding, failing to use dust extraction methods can lead to inhaling harmful particles and surface contamination, while using overly coarse grit can create deep scratches difficult to remove. Proper grit progression and consistent technique are crucial to prevent surface imperfections regardless of the sanding method.
Safety Tips and Precautions for Sanding Your Car
Wet sanding reduces dust particles, minimizing respiratory hazards and making it a safer option than dry sanding for car maintenance. Always wear a high-quality respirator mask and protective goggles when sanding to prevent inhalation of fine particles and eye irritation. Ensure proper ventilation in the workspace and keep the sanding area clean to avoid slipping hazards and equipment malfunctions.
Wet sanding vs Dry sanding Infographic